As I'm still plugging away with deck planking I thought I would post a bit of a guide to how I am doing the detailed planking around the bulkheads at the edges of the deck. I almost called it a "how to" but I think I prefer "how I did it" as there is nothing in the instructions about how to achieve this (it just says something like "cover the deck with planks") so I just did what I could with the tools I had!
So, as I get to the edges of the deck, full planks won't fit since the bulkheads start to get in the way. So, my first step is to cut a full plank and then mark the area where the bulkhead is going to overlap. I do this by first laying the plank in it's correct vertical alignment and mark where the bulkhead is, like so:
 This photo is actually a bit misleading, as I wasn't really thinking straight, but this step is much easier/more accurate if you lay a ruler against the bulkhead to mark the line.
I then lay the plank in the correct horizontal position to mark how far the bulkheads cuts into the plank like so: This then enables me to to "draw" the bulkhead position onto the plank. As a general rule I found I didn't have to be 100% accurate here as long as I always underestimated the measurements. This meant that I could sand/file to the precise dimensions. Cutting too much out would be impossible to fix! So a plank is marked like so:
 Notice that this plank goes around 2 bulkheads. The same technique was used to mark both areas to be cut. Speaking of which, on to the cutting! Simple enough I would say, I just used a basic craft knife to do the job. Although note in the first picture the direction I am cutting. This is a tip I picked up from a book after making the mistake myself. Always cut in towards the centre of the plank, rather than out from the centre, as otherwise the friction of the knife can splinter the wood.

The grooves cut rarely fit exactly so I used a small file to slowly open up the groove until it slotted into place.

And finally we have a finished plank: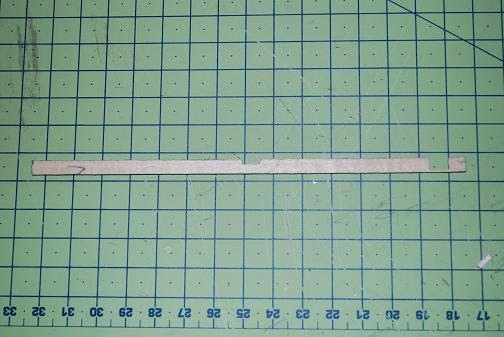 You might notice that the finished plank above isn't actually the same one that I took the other photos of. This is just because I wanted to show an example of a plank that needed some fairly extreme trimming (translation - I wanted to show off!.) The groove to the right is less then a mm from being a full plank width. That one needed some steady nerves!
So, once a plank is trimmed like this it can be slotted in and glued in the normal way. The picture belows shows how this worked in a area of planking around a bulkhead.
On top of these types of planks, there are also some very small areas left unplanked where the deck tapers towards the bow and stern. In most cases I planked these by cutting a very rough piece, glueing it the deck/neighbouring plank and then filing/sanding it to shape in position...as in this example:

One small confession to make. In my excitement of taking photographs I actually completely messed up the plank I was doing above (hence no picture of it in place!) Firstly, I wasn't careful when marking the bulkhead positions, and ended up with it not butting correctly to the next plank, leaving a nasty gap at it's end. I then made another plank, and while I was filing it I caught the top with my hand and snapped it! I ended up actually gluing the two halves on separately and it's hardly noticeable. Whoops!
Anyway, I think that's enough for one day, so I'll leave you with a terrible photo of my current position (167 planks at last count.) Happy building everyone!
Jonny.
Haven't even started yet......still working on the Bluenose!! (Just screwed up the transom) Have to finish one before I start another. Glad you're "ahead" of me. Something tells me I'm going to find your blog really useful.. I believe you're in Bristol! I was there once.......many years ago.
ReplyDeletePJ