Thursday, 29 April 2010

Good evening one and all!

As I'm still plugging away with deck planking I thought I would post a bit of a guide to how I am doing the detailed planking around the bulkheads at the edges of the deck. I almost called it a "how to" but I think I prefer "how I did it" as there is nothing in the instructions about how to achieve this (it just says something like "cover the deck with planks") so I just did what I could with the tools I had!

So, as I get to the edges of the deck, full planks won't fit since the bulkheads start to get in the way. So, my first step is to cut a full plank and then mark the area where the bulkhead is going to overlap. I do this by first laying the plank in it's correct vertical alignment and mark where the bulkhead is, like so:


This photo is actually a bit misleading, as I wasn't really thinking straight, but this step is much easier/more accurate if you lay a ruler against the bulkhead to mark the line.

I then lay the plank in the correct horizontal position to mark how far the bulkheads cuts into the plank like so:

This then enables me to to "draw" the bulkhead position onto the plank. As a general rule I found I didn't have to be 100% accurate here as long as I always underestimated the measurements. This meant that I could sand/file to the precise dimensions. Cutting too much out would be impossible to fix! So a plank is marked like so:

Notice that this plank goes around 2 bulkheads. The same technique was used to mark both areas to be cut. Speaking of which, on to the cutting! Simple enough I would say, I just used a basic craft knife to do the job. Although note in the first picture the direction I am cutting. This is a tip I picked up from a book after making the mistake myself. Always cut in towards the centre of the plank, rather than out from the centre, as otherwise the friction of the knife can splinter the wood.
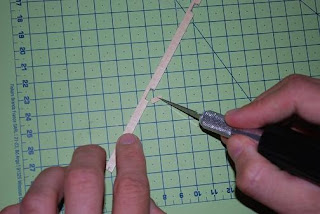

The grooves cut rarely fit exactly so I used a small file to slowly open up the groove until it slotted into place.


And finally we have a finished plank:

You might notice that the finished plank above isn't actually the same one that I took the other photos of. This is just because I wanted to show an example of a plank that needed some fairly extreme trimming (translation - I wanted to show off!.) The groove to the right is less then a mm from being a full plank width. That one needed some steady nerves!

So, once a plank is trimmed like this it can be slotted in and glued in the normal way. The picture belows shows how this worked in a area of planking around a bulkhead.


On top of these types of planks, there are also some very small areas left unplanked where the deck tapers towards the bow and stern. In most cases I planked these by cutting a very rough piece, glueing it the deck/neighbouring plank and then filing/sanding it to shape in position...as in this example:


One small confession to make. In my excitement of taking photographs I actually completely messed up the plank I was doing above (hence no picture of it in place!) Firstly, I wasn't careful when marking the bulkhead positions, and ended up with it not butting correctly to the next plank, leaving a nasty gap at it's end. I then made another plank, and while I was filing it I caught the top with my hand and snapped it! I ended up actually gluing the two halves on separately and it's hardly noticeable. Whoops!

Anyway, I think that's enough for one day, so I'll leave you with a terrible photo of my current position (167 planks at last count.)

Happy building everyone!

Jonny.

Wednesday, 28 April 2010

First big boo boo

Walking the (wonky) plank!

Well, I've now got 138 individual planks done, but not without a few choice profanities.

Before I go any further, some advice for anyone deciding to do the planking individually like I've done. Don't try and save time by doing chunks of planks in the same area at once. It is much more difficult to ensure that a plank is lying straight when there is nothing to butt the plank against lengthwise. If you look at the following picture:

Everything looks fine, but I didn't check well enough whether the top 8 planks were actually straight or not. I thought they would have enough contact with other planks to stop them 'turning' but as I progressed with the planking this wasn't the case. Some of the centre planks started to turn which resulted in gaps appearing between the planks on one side as in the following picture:
On the other side the planks started to not 'fit' and so needed some tapering, which started to look pretty ugly. Fortunetly I noticed the problem early-ish which meant that I could rectify it to some extent, but now every time I look at the deck all I can see are those mistakes!

I think I'm being a bit harsh on myself, as the picture above shows the worst section and peope keep telling me that is not as bad as I say it is, but I am bit annoyed as I know it would have been simple enough to avoid if I hadn't tried to rush and get lots of planks done at once.

For the record, the way to avoid this would have been for me to lay full runs of planks at a time, like the first run I did. This would mean every plank could be glued flush against it's neighbour and no gaps would appear.

THe main thing to remember is that the majority of this deck will be covered over, and the worst offending areas on mine will be covered.

Anyway, enough feeling sorry for myself, and more pictures of the ship with 138 planks (25 full runs) in place.


Apologies for the quality of the photos, I know it's difficult to see the planking. I have a pretty snazzy camera that I don't really know how to use properly and that has a basic lens so can't capture much!

Fiddly Planks

I've now moved on to cutting and fitting planks right up to the edge of the deck. Obviously this means doing some precision cutting to accomadate the bulkheads. I'll post again soon to show my progress and the simple methods I've used to achieve it.

For those out there who, like me, can't do anything without quantifying it, I have now cut and fitted 150 individual planking pieces. This does include some very small filler bits that I had to fix on with tweezers!

Thanks for reading!

Jonny.

p.s. I took a trip to our local second hand book shop at the weekend and found Patrick O'Brian's Master and Commander. This is the first in a long series of books (one of which is called HMS Surprise) which feature this lovely ship that I'm trying to build so it seemed fitting that I should start to read them as I'm building.

Sunday, 25 April 2010

Weclome to the Plank Factory

Nothing much to report today, but needed a break from deck planking so thought I would give a quick tour of the plank factory.

Without further ado, here it is:


Some imortant features to note:

  • The odd black shape in the middle is my new toy...an Amati Master Cutter. It's not the most amazing piece of kit out there but it doing a job for me at the moment. Basically it makes accurate right angle cuts for the ends of my planks which has made things a bit quicker/more accurate.
  • The three piles of timbers at the top are the three stages in the assembly line. From right to left, 1 - timbers roughly measured and cut; 2 - Timbers after they have been carefully sanded to the exact length against the test plank; 3 - caulked and completed planks.
  • The much needed "chips and dips" that keep me fueled and ready to go for more planking!
  • Things have been coming along very well today and plank production has increased dramatically. I've made and fitted another 8 (bringing the total on the ship to 62) and I have another 24 ready to go. There is also another 16 in the assembly line.
By my calculations if I do another 32 planks today then I'll have enough to finish the main chunk of the deck and then I can move onto the trickier edges.

Well, best get back to it!

Jonny.

Friday, 23 April 2010

Plank Factory

Just a quick update today to show my progress on the deck planking.

Since the planks are staggered the first plank in each run will be a different length (either 50mm, 100mm or a full 150mm plank.) So to start with I had to cut and sand some 50mm and 100mm planks and then I began glueing and fitting them. I started out using the same method as before to clamp them down while drying..however as I got to outer planks this doesn;'t really work as the clamping planks bend in the middle, making them a bit useless when glueing multiple planks at once. I haven't come up with a catch all solution to this, but I have just used clamps directly where I can, or simply get a block of wood and put "something" (see photo below for some amusing examples) on it to hold the plank down. Rough and ready I know, but it gets the job done!
Some photos below showing the progress.

24 planks with clamping;

39 planks fitted:


The current position. Don't worry, the tea that was in the mini eggs mug is now safely in my belly! No chance of a terrifying spillage!
I think I'm going to spend a good chunk of this evening making a big batch of planks. I'm going to aim for a 5:1 planks to mugs of tea ratio.....going to have to find another mug though!

Jonny.

WAIT A MINUTE!! I can't believe I nearly forgot, but the fourth installment arrived this morning!! Not quite as exciting as before I suppose because I'm no where near being able to start on it!

Anyway here's what you get:

Not much in terms of parts, but plenty in terms of potential work time! The bag contains about a billion more pins and the bundle of wood is all 2x5 strips of basewood. This wood will be used to plank the hull.....new word coming here....freeboard. A bit of research tells me that the freeboard is the part of the hull which is above the waterline. All the hull below the water will be planked with a differed wood.

So once I have finished planking the false deck I will be facing the daunting task of embarking on the hull planking. More on that later when I can pluck up the courage to admit that I'm going to have to do it!

Jonny.

Wednesday, 21 April 2010

One plank down...one or two to go!

Hello again!

Starting to get into the swing of this build now as it's all I can think about when I'm work. I have fallen asleep on numerous occasions with visions of planks and clamps running through my head. All very exciting (if slightly disturbing).

Without further ado, here's a picture, because it shows the first planking run!


Planks, planks and more planks

As I said in the previous post I've got to cut around 150 planks from the basewood provided by AL. The method I've used to do this is fairly straightforward. I carefully measured one plank so that it was exactly 150mm. I then use this plank to measure the length of a second plank. I use a mitre block and small hacksaw to make the first cut into the plank, so that I know it will be straight. I then finish cutting the plank using a "bone saw." I then hold this plank against the test plank and carefully sand the edge until their edges are flush. And that's it! Rinse and repeat, and repeat, and repeat, and.......One thing I am trying to be careful not to do is to sand the guide plank (I've actually written on my guide plank "Guide plank - do not sand!") If I slightly sand the plank each time my planks would become progressively shorter. To try and stop this I've just been checking the measurement of the guide plank every so often. As soon as I see it get shorter and start using a new one. At some point I might try and post some pictures of this process in case anyone is interested.

Caulking
Caulking is another example of a word that I saw thrown around a lot when I first started looking into model ship building, which I had no clue about! However, it seems to be a widely discussed topic so it didn't take too long to get an idea of what it was about. Basically, when a real ship was built the gaps between planks on the deck would have been filled (caulked) to make them water tight. This gives the gaps between planks a dark colour. There are a few ways of simulating this effect on a model ship, but the most common (and easiest) I have seen is simply the run a HB (or #2 for our American friends) pencil around all the edges. This is the technique I have used, so for every plank I have made I have used the side of a HB pencil to "colour in" the edge.
Laying those planks

Now comes the fun part! Time to lay the planks. I originally thought that I would lay the first plank with it's edge along the middle line of the deck, which would help me keep it straight. However, looking at the instructions, and other build logs, I decided to lay the first plank right in the middle of the deck. So it runs over the middle line of the deck.
I applied some glue to the back of the first plank and carefully lined it up, starting from the bow. To hold it in place while the glue dried I lay some other planks across it and clamped these to the deck like so:


I then simply repeated the process making sure the planks were in line and butted tightly against each other. I had to cut and measure a smaller piece to finish off the first run.

And voila! My first plank run.


To speed things up from here I will start planking smaller sections of the deck so that I can clamp down a few planks at once, rather than doing one run at a time. Hopefully the first plank run will make sure everything lines up!

So, from here I will be doing lots of the same thing, getting all the planks cut and layed, so updates may come slowly, but I will try and post the occasional photo to show how I am progressing!

Happy building!

Jonny.

Sunday, 18 April 2010

False Gun Deck

Well, there's been another nice long break between posts thanks to a lovely holiday in Spain and Morrocco. We flew back into Bristol at around midnight on Wednesday night, just hours before all planes were grounded throughout the UK due to the volcano dustcloud from Iceland!

Anyway, back to the Surprise, and some slight progress has been made. I've glued and pinned all the parts of the false gun deck. This didn't prove too difficult with my trusty "pin pusher." Anyone starting out in model ship building who isn't aware of these should definately get one. When I started the small Victory model I had problems hammering pins into the deck as I couldn't get them 'started', as it were. The pin pusher means you can accurately place the pin where you want it, push it some of the way in, and then use a small tap hammer to finish the job.

The only other thing to say about the deck was that I marked two lines where the edges of the bulkheads are so that I was hammering pins through both the deck and the bulkhead. I did this by simply holding a ruler against the edge of the bulkhead and drew a line athwartship on either side (look at me using the nautical terminology already! Athwartship is the direction running across the width of the ship, from port to starboard)
Some pictures, because I am waffling:

Next step is to plank the false gun deck. The instructions tell me to just lay full planks along the deck and then mark the "butts" (where the ends of two planks meet each other) with a pencil. I don't really like this idea as I think it will look a bit fake and weird, especially since one of the planks provided in the kit won't cover the whole length of the ship so there will be some real butts and some false ones. For these reasons, and because I want some practice at doing 'proper' planks I have decided to cut and lay individual planks even for this false gun deck which will mostly be covered.

I asked some questions about this on Model Ship world and the general consensus was to go for it if I wanted to. Having done some research into ways of doing it I have decided to try a "3 butt shift." I have no idea if this is even close to being historically or practically accurate, but I like the sound of it...which is good enough for me! It also involves som calculating and measuring, which appeals to the mathematician in me.

3 Butt Shift


So here's what I'm going to do next. Thanks to a post on MSW I am told that planks would usually have been around 24' long (or somewhere between 20 and 25 feet.) At the scale I am working at (1:48) this will mean planks of around 150mm. For the maths fans out there this is best understood and calculated by saying that the scale basically tells us that 1 foot on the model is the same as 48 feet on the real thing. 1 foot is equal to around 308mm. So to find the size of one foot on the model we devide 308 by 48 (around 6.4). So to find the scaled length of 24 feet we simply multiply 6.4 by 24. This gives a number somewhere around 150mm.

To do a 3 butt shift I take one plank and lay it on the deck. For the next athwartship (there I go again!) plank I offset the start of the plank so that it won't line up with the first. I do this again with the third plank. The start of the fourth plank will then line up with the end of the first plank. Since a plank is 150mm long, then "shifts" must be 50mm for this to work. So the first plank is at 0. The second plank is offset by 50mm, the third by 100mm and then the fourth plank will be offset 150mm, the full length of one plank.

Something tells me that pictures are going to be able to explain all that a lot clearer than I ever could!

Anyway, onward and upward. Decks to plank.

Jonny.